Monday, July 14, 2014

Couture Gel Nail Polish Review

Hey Everyone!!! Ok, I am ready to start gel week! I love gel polish because it gives my nails some strength. I started out with the basic Gelish kit and the lamp from the SensatioNail kit. I had been researching for a better lamp for a long time. I had also seen a swatch of Couture Gel Polish in Aloe Very which I fell in love with. After asking some questions from both the company and a blogger I decided to give Couture Gel Nail Polish a try. I bought my kit and patiently waited for it to come.

I had looked and looked before I finally decided to take the plunge on Couture Gel Nail Polish. I decided to buy the deluxe kit because it came with three gel polishes and was the best value. I did have a coupon code to help offset the cost. Considering I was looking at LED lamps alone that cost $200 this kit was a great deal. I did pay for my kit and nothing was given to me for review of this product. The kit currently runs for $129 on the site.


I was super excited when the kit arrived. The Deluxe Starter kit comes with a ton of stuff. It was packed very well and delivery was pretty quick.


The Deluxe kit came with the LED light which was my main reason for buying. It came with top coat, base coat and three colors which you get to choose. I chose Aloe Very because I had wanted that polish for a very long time. I also chose Dance till Dawn and Pillow Talk. The kit also came with a pretty big bottle of Clense and Remove and a instructional dvd. There was a bonus manicure kit included as well as a cosmetic case and a free sample of their foil remover wraps. 


The light is pretty cute and reminds me of a space ship. I mainly purchased this kit for the light so this was an important part of the purchase. It feels pretty sturdy but isn't overly heavy. 


The light has different time settings on it in increments of 30 seconds. There is a 30, 60 and 90 second timer and then a 30 minute timer. I am not sure exactly what one would want a 30 minute time setting for but it is an option. The light beeps when it turns on and off. The beep annoys me greatly but it didn't seem to annoy anyone in the house so I guess it is just me. I would love to be able to turn the beep off or make it quieter.


A shot of all the bubble led lights. I love the way they look. 


The lamp in action. It is big enough that I could fit my thumb in there if I wanted to. I still cure my thumbs on their own.


Quite the roomy lamp. 


Everything arrived in perfect condition however the top coat did have some polish in the thread and around the neck of the bottle. It was a little bit annoying but nothing major. I cleaned up the threads and the neck however there is still some polish in the threads of the cap so it is still messy. Again, nothing major just something that happened with one bottle in the package.


I will do a review of the polishes later but I did want to show a quick picture of the first mani I did with this system. I used only Couture Gel products for the first mani so that I could judge how the system worked. I used Aloe Very first because I wanted that polish the most. 


I did have some lifting at the tips and chipping on the index and thumb nails. I often have lifting and chipping because my nails are peely and have some issues. I will say that this happened within 3 days of doing the gel mani which is on the quick side. I can usually get about 5-7 days out of my gel mani without having too much of a lifting problem. 3 days bothered me but I thought maybe it is because I usually use a bonder with my gel manis. If it hadn't peeled off so much I wouldn't have taken my mani off so quickly but it was to the point where I had to remove it. I lightly buffed the top of the mani to help aid in removal.


I had never used foil remover wraps before so I decided to give them a try. They are cute precut strips with a cotton pad attached to them. You saturate the pad and wrap your nails up tight.


Aren't they cute? I forgot to take a picture when I removed my first hand so this is actually a picture on my second hand. I was able to get away with using only 5 wraps. The polish came off so nicely I was able to resaturate the pad and then use the same wraps on my other hand. This made me happy since I was able to stretch the wraps out longer.


As you can see the polish removed quite quickly and easily. It pretty much just popped right off. I wish my gel manis came off this easily every time. I absolutely love these remover wraps. I am considering ordering more because I really like the ease of using them.


I was quite impressed with how easily the polish popped off my nails. 

I had not really heard much on this company before seeing a swatch of Aloe Very and looking further into it. The company overall had a very quick response time when I asked questions. The products all seem to be of good quality and I am very happy with the light which I have used several times since getting it. The beeping annoys me but that is just a personal thing against noise that I have. I am still experimenting with their base and top and a combination of products that will work best for my nails but I would definitely purchase from this company again. There are several colors I would still like to try.

 My only real complaint has somewhat been fixed by the company. Since ordering they have changed their site to have actual swatches of each color on real nails instead of the little color bubbles they had before. When I ordered the swatches were not available and I wasn't able to really find a swatch of Pillow Talk when I googled it. I ordered Pillow Talk based on the swatch bubble and the picture that they had on the website in their try it on image. The color is completely inaccurate and I ended up with a pink I would describe as a light bubblegum rather than the pretty pale color I thought I was ordering. 


I snapped this screen shot just now because it illustrates the difference in the color I thought I was ordering vs the one that actually came. The picture on the hand on the left is what the color looked like online before the real swatches were added. The color on the right, third picture from left in the top row, is the color that arrived. The description also led me to believe it would be closer to the pale picture on the left. I am not a fan of pink and I would not order that shade on purpose. Honestly between lack of time and not really wanting to go through the hassle I just kept the bottle and chalked it up as a live and learn experience. I was pretty much taking a chance anyway since I hadn't found any real swatches for this color I just happened to go the wrong way on this one.  

Despite my new pink polish I am very happy with my purchase and the product. I will definitely order in the future as there is already a list of polishes I would like. I also fell in love with the removal wraps and their ease of use. I love the lamp and it has worked with other brands and systems with no issue whatsoever. 

That's all for now :)

Friday, July 11, 2014

July Festive Mani

Hey Everyone!!! I can see again!! I could actually always see but some days it was more uncomfortable than others. Today my eye is actually bugging me a little more than it was yesterday but it isn't as bad as it was. Luckily it started feeling better before the $350 eye drops they wanted me to use. I politely said heck no I am not spending that much on a 30 day supply of eye drops you are out of your mind. That was WITH a discount coupon too. Hopefully it feels completely better within a week and I don't have to think about those eye drops again. For now I am using the gel and ointment and drops you can get over the counter and things are improving. 

Today I have my after the 4th of July festive July 4th mani. I loved this mani after I did it but I used the Elmer's Glue base for easier removal and after one hour at the kennel I had some chipping. I took pictures and then removed the mani which sadly didn't even last 24 hours.


I used a base of Essie Hide & Go Chic from their 2014 Spring Collection. I used two coats.


I topped Hide & Go Chic with my July 4th Franken. I used two coats of the franken.


This mani was quite sparkly and fun. I almost want to do it again because I loved it so much and it didn't get to stay on for very long. 


That's all for now :)

Monday, July 7, 2014

Spoiled Music Notes

Hey Everyone!! I am having some wicked dry eye issues lately. They are causing headaches and general annoyances. I had such a bad headache both Thursday night and Friday afternoon when I was finally ready to do my July 4th mani that I just skipped it. My nails have pretty much been naked all weekend. It is terrible. So are my peelies and the general state of my nails. Yesterday I was going through a box of polishes that I know are dupes and I found the 5 frankens I had made a year ago. That includes the July 4th franken I made last year. I was so annoyed because I wanted to wear that this year but couldn't find it. I might do a July 4th mani in the next couple of days just for fun. I am going to hold off on starting gel polish week until this stupid eye gets under control. The computer aggravates it and I don't want to start the week and not be able to finish it. 

Today I have a fun mani I did for T's end of year concert.


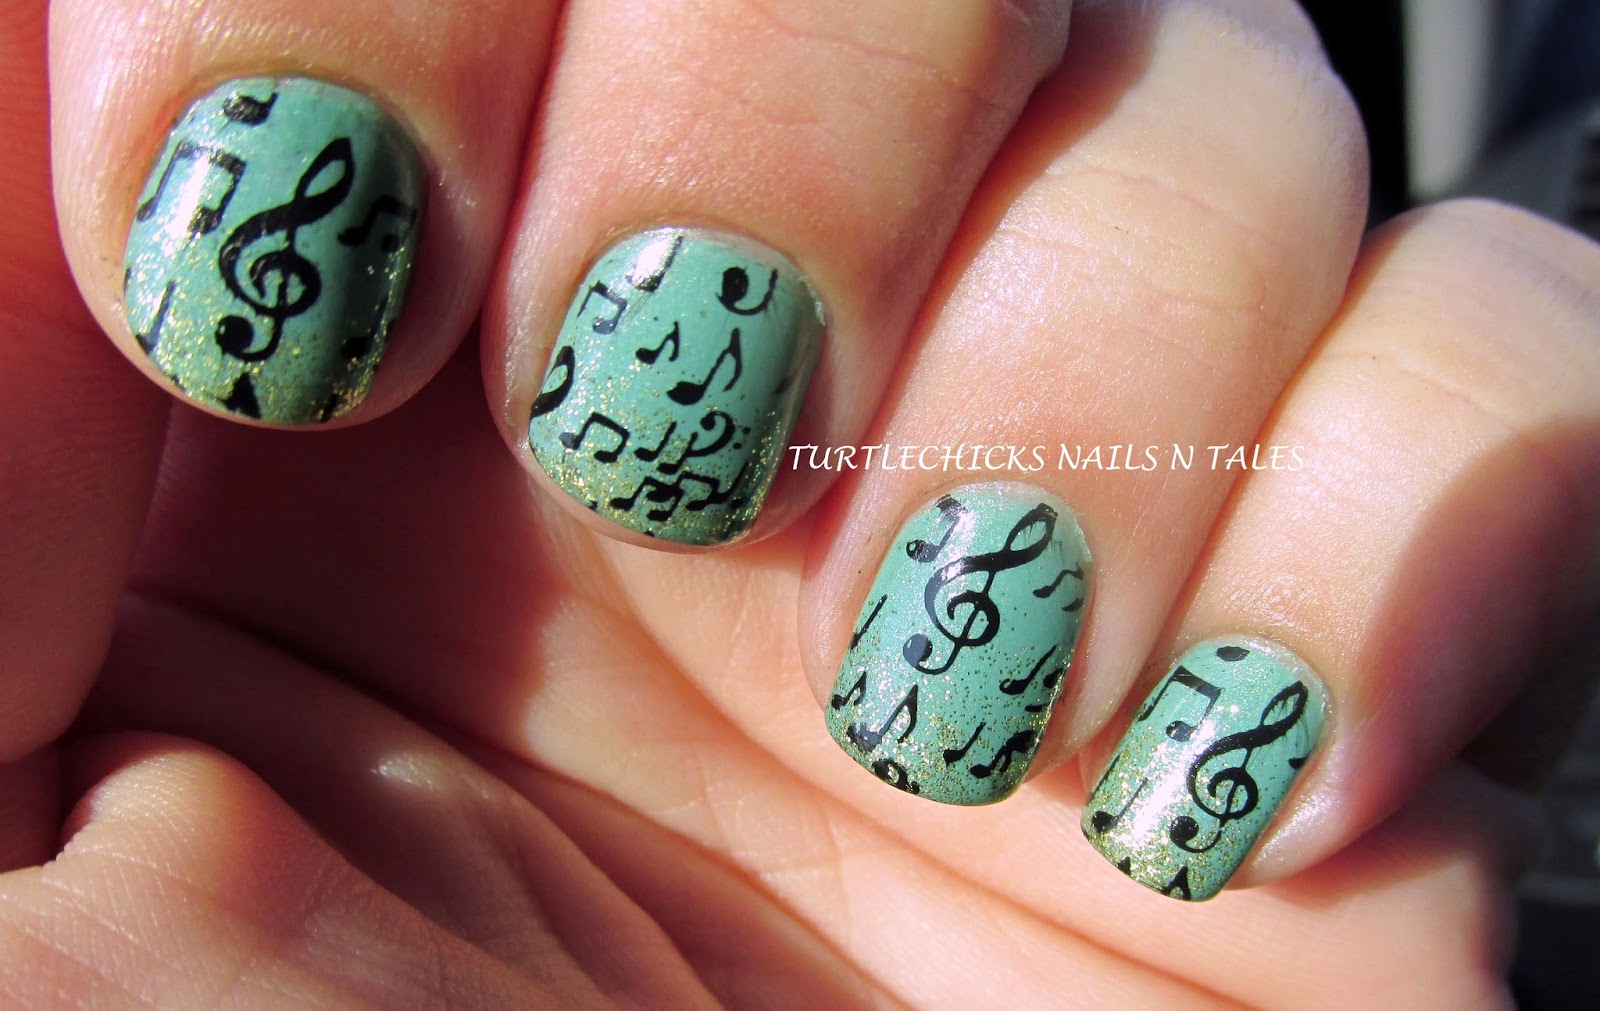
I used my new Messy Mansion purple rectangle stamper and Spoiled Toad-ally Amazing and Champagne Siren.I stamped with Konad black and BBF plate BBF-09 for the music notes.


A better picture of BBF 09. I am torn on these plates. I got them in a group buy on facebook and was super excited for them. It took a bit for the order to come since they are made in Brazil by a very small company. The designs are really really cute. The plates themselves are really small, much smaller than I thought, but the images are big enough for my nails and then some. I had a really hard time with some of them stamping properly though. A really hard time.  I was very tempted to sell or trade them away after swatching them into my book took so much effort. Picking the image up for this mani was no picnic either. For now I have decided to hold on to them and see how I feel next time I use them but I have already opted to not join other group buys for them. It is sad too because they have some really cute images. 


I started the mani using a base of Spoiled Toad-ally Amazing. I think I did three coats but at this point I can't remember for sure. C bought me both of these polishes as a cute little anniversary gift. I hadn't worn them soon enough and he started complaining about it so I decided to use them together for this mani. 


I used a sponge to create glitter gradient tips. I really like how fine the glitter is and how pretty these two colors worked together. 


I stamped the music notes on with my Messy Mansion stamper. I love that stamper. It cooperated best with the BBF plate but I did have some issues here and there.


Top coat of course smeared my stamping and made me very angry.


Overall I loved this mani even with the smears. I love the color combination which is amazing because I am not really big on gold. C did good in picking out these colors for me. Maybe I should convince him to buy me polish more often.


That's all for now :)

Thursday, July 3, 2014

July 3rd

Hey Everyone!! This should have been up earlier but for some reason my computer at work would not put the pictures in properly. Since everything was sideways or upside down I figured I should probably wait until I got home. That turned out for the better because I was able to get a bottle shot and use my actual camera. I wanted to show you my pre-July 4th mani. I call it my July 3rd mani. 


I was not sure what I wanted to do but I was really tired so I pretty much just pulled some polishes from my drawer to use for my 4th manis. I wanted to use this Salon Perfect polish that I picked up in Port Charlotte when we were vacationing. Their Walmart had a very nice polish section. I also thought perhaps I should dip my toes in and try the China Glaze Crinkled Chrome polish I picked up on clearance on clearance awhile back. I used Aluminate from the Crinkled Chrome line and Save Me a Spot from the patriotic Salon Perfect display.


I used two coats of Aluminate for the base. I have to say I saw so many mixed reactions on this line but I love it. It has a weird texture going on but I am weird so I am attracted to it. I think I might have to score a couple more next time Sally does their clearance on clearance. I know there are several still floating around.


If you notice the bottle of Save Me a Spot there is quite a bit missing. This is because I am a complete spaz and dropped the open bottle on the floor last night. It bounced and left a glorious patriotic trail until it rolled to a stop and blobed out a whole puddle full of polish. Because I was sitting on the couch and had a bunch of stuff on my lap I wasn't able to spring into action and probably lost a bit more polish. I was not very thrilled about the whole situation. I think it is about time I find that pool noodle and cut it up to make polish holders for myself.


Now I do like Save Me a Spot but this mani was not what I envisioned. Throwing the bottle of polish across the room probably didn't help my feelings toward it. It is fun and cute but it just reminds me of the book Put Me in the Zoo. I absolutely LOVE that book but it doesn't scream July 4th to me and quite frankly that is part of the reason it is not going to see the dawn's early light. 


Save Me a Spot has a lot of glitter but getting enough out was a fishing expedition. That furthered my annoyance. I used a make up sponge and just globbed some polish on and then blotted the glitter on. I can't tell you how many times I blobbed glitter on only to find that there was actually nothing but clear polish on my sponge. 


Overall I like both of these polishes but I just wasn't feeling the mani. Save Me a Spot has great matte circle glitter but it isn't the easiest to get out. If I hadn't used the makeup sponge my nails might be a quarter of an inch thick by the time I got the glitter on there. Does the middle nail in the picture above remind anyone else of a smiley face? I feel like it is staring at me and it kind of creeps me out.

That's all for now :)

Tuesday, July 1, 2014

Leaden Lilac

Hey Everyone!! After an awful Monday I am happy to say that Tuesday is looking better. I started to post yesterday but I was in no mood to even try and hide my hostility with the universe. I have a review of Couture Gel Nail Polish as well as some other gel polish brands coming up. I am thinking next week might be a gel polish week. Right now my nails broke down to nublets so they are not  very exciting. Luckily you won't have to see them today since I am using a mani from a week or so ago. 

Today I have a mani using one of the new Sally Hansen Color Foil polishes. 


I used Sally Hansen Color Foil in Leaden Lilac for the base. I love this shade and I love foils/chromes but boy do they show every fault in your nail. I used China Glaze Keep Calm, Paint On from the 2013 Spring Avant Garden Collection for stamping. 


I stamped with Pueen plate PUEEN23 from the 25F Sumptuous plate set.


I wanted to do something different so I left my accent nail without a base color. I painted three coats of Leaden Lilac on the rest of the nails. 


You can see on my pinkie a little bald spot. I didn't exercise enough patience and leave enough time between each coat. There was balding, there was dragging and there was cursing. I actually had to redo the mani twice because it was so bad the first time. The second time was a little better but as you can see I still had a bald spot. Leaving a little more time between coats would help. 


You had to be pretty quick with the stamping since the foil dried fairly quickly. Obviously not quickly enough to satisfy me between coats but quicker than I would have liked for stamping. Typical. Keep Calm, Paint On worked nicely for stamping. 


I think a better, bolder design would have worked better on the accent nail but I didn't think of that until after I was finished. I wasn't about to redo the whole mani yet another time.


I love foil polish but you can see every flaw in my nails and let me tell you my nails have a lot of them. I was thinking this would probably be really nice to apply over a gel mani. You bet your sweet bippy I used a base coat and a top coat despite the bottle advising otherwise. Sorry, I heard that phrase on tv recently and it cracked me up. I have been dying to use it since. 


I won't run out and get all of these colors but if I happen to find the ones I didn't pick up on clearance they sure will come home with me. I only picked up a few of the colors that I didn't have anything similar to. I definitely would like to add Yellow Gold and Minted Metal to my stash at some point.

That's all for now :)

Thursday, June 26, 2014

Hot Pink Stars

Hey Everyone!!! This week has been a pain in the butt. I am ready for it to be Friday at 5pm. Sounds like it is going to storm soon. I love the storms but C has to drive about 30 mins away for a job interview so I would prefer it not to be storming while he is driving. Apparently soccer is on, Again. I would really like to not be forced to listen to soccer in Spanish. I don't like soccer as it is much less when having to listen to it in Spanish. I am slightly cranky today. I don't have a car, C took it to go to the interview, and I don't have lunch. I should probably just get on with the mani before I get too cranky.

Today I have a fun mani I did using a neon jelly polish I made and ArtsyFartsyCrafts stars. 


I did a gradient with a kitchen sponge and Sally Girl Cool. I am getting better at the gradients I think. I found the key. I used to use makeup sponges but after watching videos on YouTube I found that using a kitchen sponge is much better. Ever since I tried that my gradients have come out much better. The makeup sponges are great for glitter though so I didn't buy a million of them for no reason.


I had made a neon pink jelly polish by using Sally Girl Cool and clear polish I had laying around. I added about 20 or so drops to get it the color I wanted. I painted that over the gradient and it helped it blend in and give the rest of the nail a nice pop of pink.


I finally decided to use the black stars for a mani. I wanted to do something different so I placed them at the tip instead of near the cuticle. I didn't get them all centered perfectly but they aren't too bad. I love the black stars with the hot pink.


This mani was super bright and fun. I loved it. I still need to work on my gradient skills a bit but I was pretty pleased with how this one turned out. Now I must do it in other neon colors. 


That's all for now :)

Tuesday, June 24, 2014

Dragon Scales

Hey Everyone!!! Yesterday I got it in my head that I wanted to make some polish jewelry pieces. I pretty much spent the day thinking up designs and being very antsy to get started. I only was able to start one piece being that I was at work and by the time I got home I was tired and not feeling well. Apparently I am going to make the pieces I planned out because I am ready to work on them! I always get these crazy ideas I feel I must do and then I work and work on them. Sometimes I actually finish them and sometimes I don't. I have a problem with not finishing projects too. 

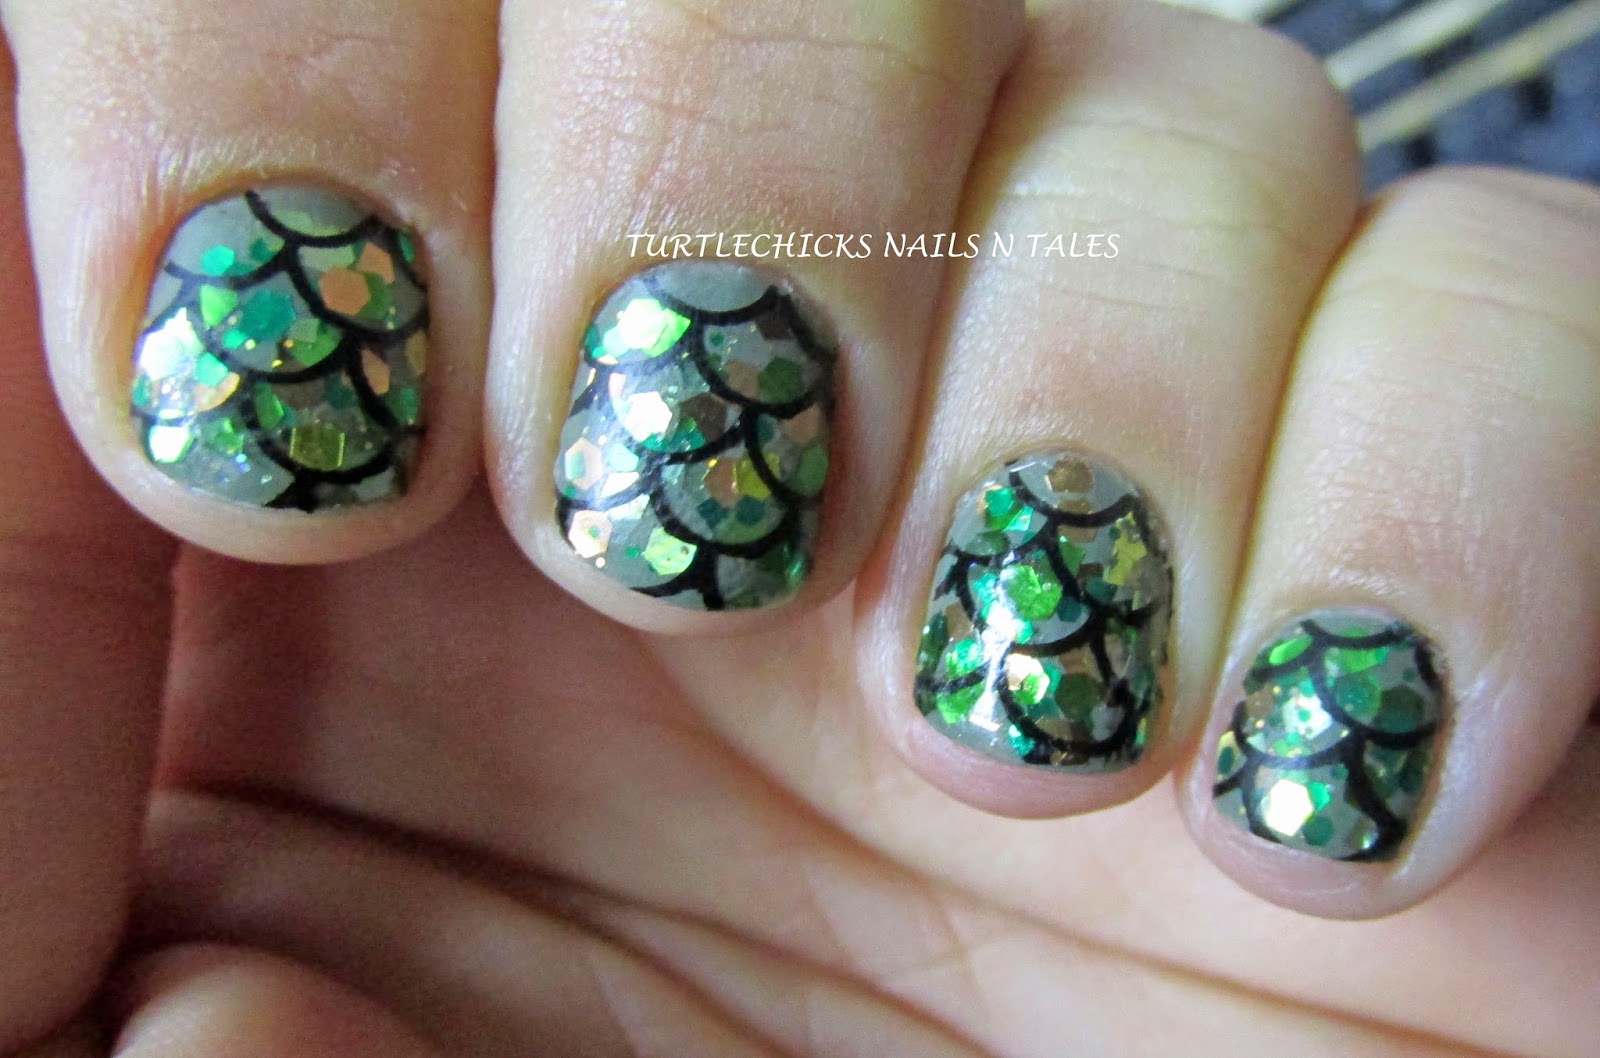
Today I have the finish of the mani I showed you last week. I started with a base of Catrice Enter the Undergrowth and Darling Diva Pendragon. I turned that mani into a dragon mani. 


I used GALS stamping plate GA14 and Konad black stamping polish. I thought this image would give it a scale like appearance.


I used Matte Top Coat to give it a matte effect. I love matte top coat over glitter. 


I love this mani. I love the colors and with the stamping I can totally see dragon scales. 


My stamping did get a little bit smeared by the top coat but I think it was mostly my fault. It didn't happen on every nail. I really need to get better at top coating stamping.


I love this mani. I love Pendragon and had it on my wishlist for a really long time before I finally pulled the trigger. I am so happy that I did. 


I was also thinking this color combination would make a nice camo mani. I might have to try that at some point later on.


That's all for now :)